Fate/Apocrypha – Production Notes 13-14
We’re almost as behind on the coverage of Fate/Apocrypha as studio A-1 is on its production, but it remains a project that’s earned its right to be covered in detail without skipping to its most recent accolades. You can expect these posts to go up very consistently so that we can be fully caught up soon. But for now, here’s the beginning of its second cours!
Episode 13
StoryboardStoryboard (絵コンテ, ekonte): The blueprints of animation. A series of usually simple drawings serving as anime's visual script, drawn on special sheets with fields for the animation cut number, notes for the staff and the matching lines of dialogue.: Yoshikazu Miyao
Episode DirectionEpisode Direction (演出, enshutsu): A creative but also coordinative task, as it entails supervising the many departments and artists involved in the production of an episode – approving animation layouts alongside the Animation Director, overseeing the work of the photography team, the art department, CG staff... The role also exists in movies, refering to the individuals similarly in charge of segments of the film.: Matsuo Asami
Chief Animation DirectorChief Animation Director (総作画監督, Sou Sakuga Kantoku): Often an overall credit that tends to be in the hands of the character designer, though as of late messy projects with multiple Chief ADs have increased in number; moreso than the regular animation directors, their job is to ensure the characters look like they're supposed to. Consistency is their goal, which they will enforce as much as they want (and can).: Kiminori Ito
Animation DirectionAnimation Direction (作画監督, sakuga kantoku): The artists supervising the quality and consistency of the animation itself. They might correct cuts that deviate from the designs too much if they see it fit, but their job is mostly to ensure the motion is up to par while not looking too rough. Plenty of specialized Animation Direction roles exist – mecha, effects, creatures, all focused in one particular recurring element.: Kazuma Tanaka, Rie Usui, Chiaki Naruzumi, Takehiro Miura, Kurinishi Yusuke, Satoshi Noma, Osamu Kobayashi, Hidekazu Ebina
Action Animation DirectionAnimation Direction (作画監督, sakuga kantoku): The artists supervising the quality and consistency of the animation itself. They might correct cuts that deviate from the designs too much if they see it fit, but their job is mostly to ensure the motion is up to par while not looking too rough. Plenty of specialized Animation Direction roles exist – mecha, effects, creatures, all focused in one particular recurring element.: Shun Enokido, Takahito Sakazume
Key AnimationKey Animation (原画, genga): These artists draw the pivotal moments within the animation, basically defining the motion without actually completing the cut. The anime industry is known for allowing these individual artists lots of room to express their own style.: Keiji Hanzawa, Masaru Suzuki, Yukie Ohashi, Toshiko Hashimoto, Mayumi Funakoshi, Hidetoshi Oomori, Yusuke Suzuki, Kyohei Yamamoto, Xie Yuan Qian, Kouji Hirama, Kenji Nishikawa, Bu Se-myeong, Koichi Takai, Hikaru Hosozawa, Chiho Fujiwara
Kazuma Tanaka, Takahito Sakazume, Shun Enokido, Yuki Akutagawa, Takuro Naka
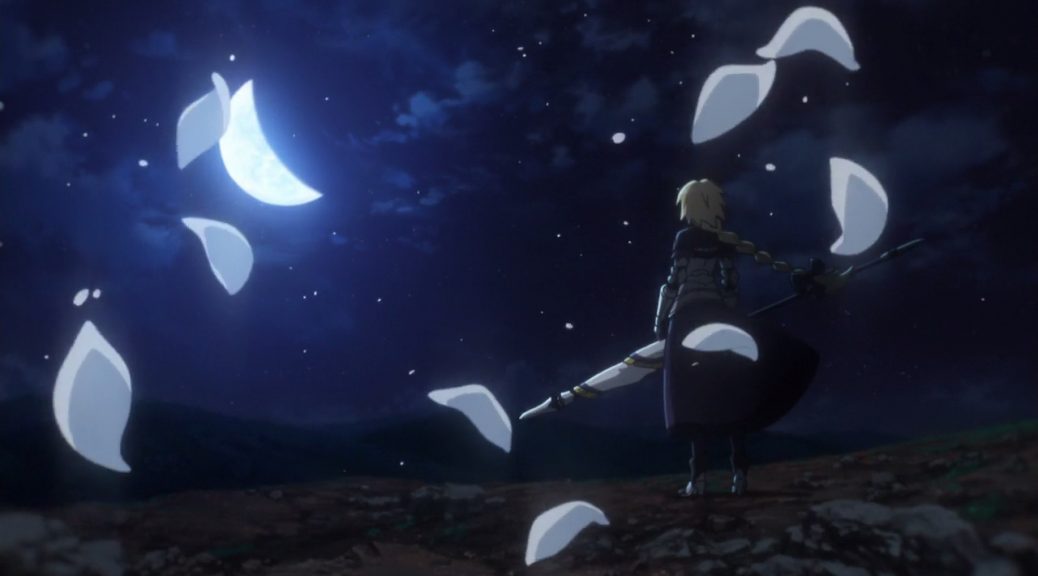
─ The shots mirroring Sieg and Astolfo‘s situation are a neat reminder that the Master-Servant relationship they now have isn’t the only bond between them. As ludicrous of a development as that was, it’s still a turn of events that I fully welcome. Astolfo has shaped up to be one of the most likable characters in the franchise simply on account of how nice he is, but his genuine care for Sieg proves that he deserves far more than the unsettling discourse that surrounds him within most communities. Getting rid of that by this stage may be a tall order, but fortunately that isn’t the case for his previous master, whose name I won’t spare the brain cells to remember. This is hardly among the most inspired episodes in the series, but we can call it a day as a positive experience on account of her disappearance. Thank you for your services Mordred, our rebellious teenage of a hero.
Episode 14
StoryboardStoryboard (絵コンテ, ekonte): The blueprints of animation. A series of usually simple drawings serving as anime's visual script, drawn on special sheets with fields for the animation cut number, notes for the staff and the matching lines of dialogue.: Mitsutoshi Sato
Episode DirectionEpisode Direction (演出, enshutsu): A creative but also coordinative task, as it entails supervising the many departments and artists involved in the production of an episode – approving animation layouts alongside the Animation Director, overseeing the work of the photography team, the art department, CG staff... The role also exists in movies, refering to the individuals similarly in charge of segments of the film.: Keisuke Nishijima
Chief Animation DirectionAnimation Direction (作画監督, sakuga kantoku): The artists supervising the quality and consistency of the animation itself. They might correct cuts that deviate from the designs too much if they see it fit, but their job is mostly to ensure the motion is up to par while not looking too rough. Plenty of specialized Animation Direction roles exist – mecha, effects, creatures, all focused in one particular recurring element.: Yukei Yamada
Animation DirectionAnimation Direction (作画監督, sakuga kantoku): The artists supervising the quality and consistency of the animation itself. They might correct cuts that deviate from the designs too much if they see it fit, but their job is mostly to ensure the motion is up to par while not looking too rough. Plenty of specialized Animation Direction roles exist – mecha, effects, creatures, all focused in one particular recurring element.: Sachiko Tsuji, Shunryo Yamamura, Toshiya Kouno, Takashi Irie, Satomi Kurita, Yukitaka Kimura, Yurie Hama, Kohei Yamazaki, Osamu Kobayashi
Action Animation DirectionAnimation Direction (作画監督, sakuga kantoku): The artists supervising the quality and consistency of the animation itself. They might correct cuts that deviate from the designs too much if they see it fit, but their job is mostly to ensure the motion is up to par while not looking too rough. Plenty of specialized Animation Direction roles exist – mecha, effects, creatures, all focused in one particular recurring element.: Takahito Sakazume
Key AnimationKey Animation (原画, genga): These artists draw the pivotal moments within the animation, basically defining the motion without actually completing the cut. The anime industry is known for allowing these individual artists lots of room to express their own style.: Kenji Kanie, Yoshitaka Sato, Tsuyoshi Moriyama, Masami Yamashita, Hiroyuki Takeuchi, Junichi Hashimoto, Keita Watabe, Yoshio Yoshimatsu, Fuyume Kawajiri, Tatsuya Urano, Junko Matsushita, Nanako Ninomiya, Miyuki Inoue, Hiroaki Shimizu, Nagisa Takahashi, Hiroshi Yamamoto, Takumi Onuki
ART BASE BAM
Takashi Irie, Toru Iwasawa, Koichi Kikuta, Arifumi Imai, Takahito Sakazume
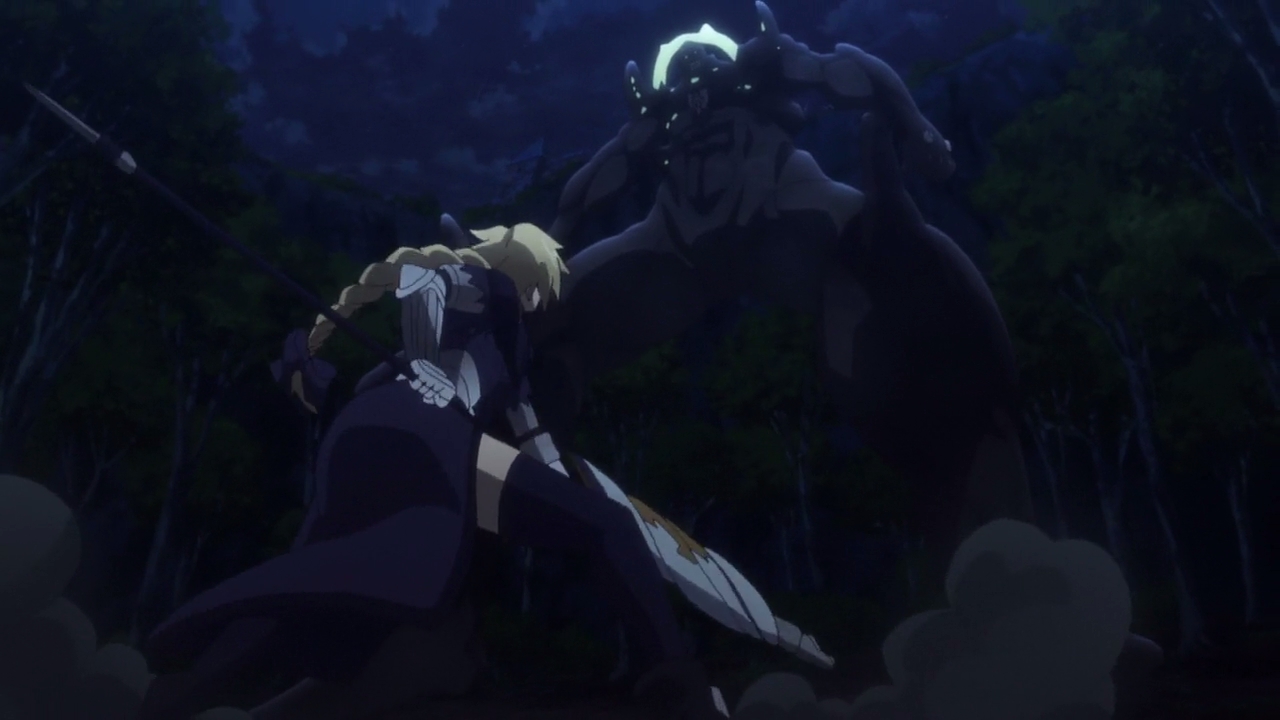
─ If resource conservation was the goal of the previous week’s outing, then it’s safe to say that it paid off. While the first half may not have much worth highlighting due to its focus on the fallout from the previous events, everything changes with the arrival of Avicebron’s Noble Phantasm, Keter Malkuth. Astolfo’s dashing rescue as Fiore was about to be hit kicks off one big, cohesive action setpiece, also notable in and of itself due to the neat portrayal of aerial of dynamics. Koichi Kikuta provided the layoutsLayouts (レイアウト): The drawings where animation is actually born; they expand the usually simple visual ideas from the storyboard into the actual skeleton of animation, detailing both the work of the key animator and the background artists. here, so it shouldn’t come as too much of a surprise that the concept of staying on model gets thrown out the window when the mind behind Konosuba‘s loose animation designs is involved. Not a bad thing either, as far as I’m concerned! I dare you to keep your face on model while darting through the sky on a hippogriff at high speeds.
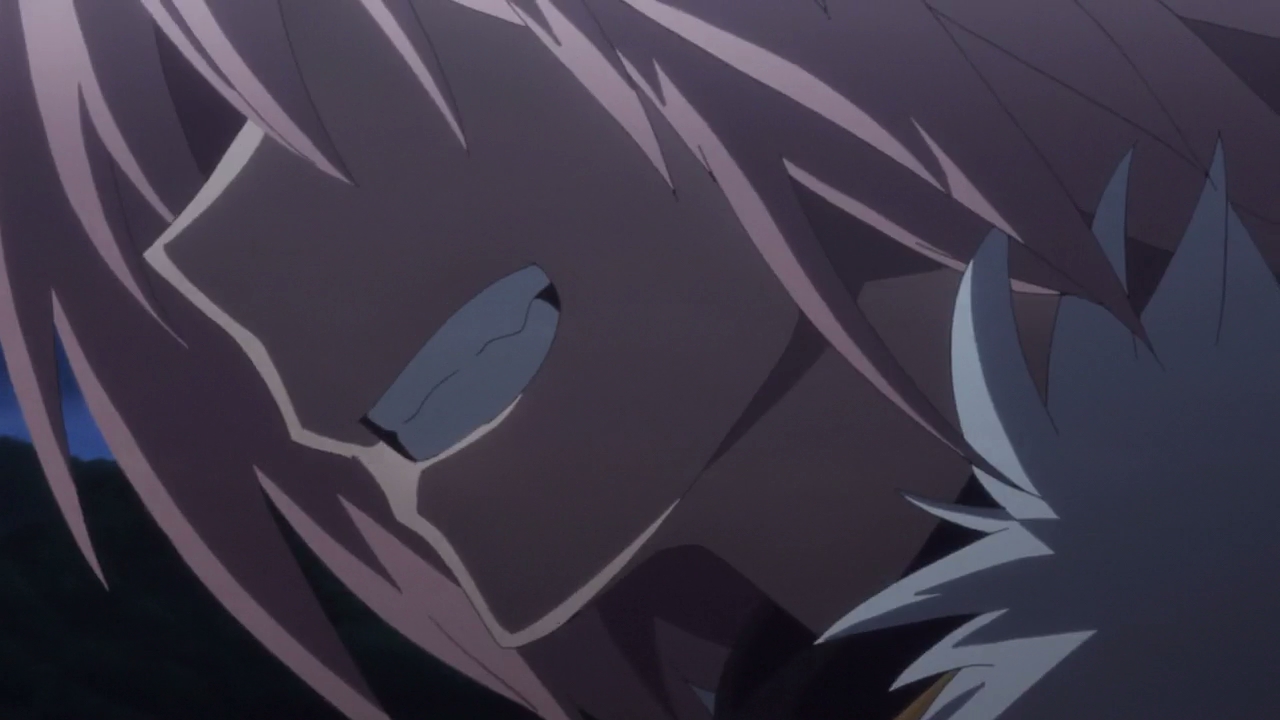
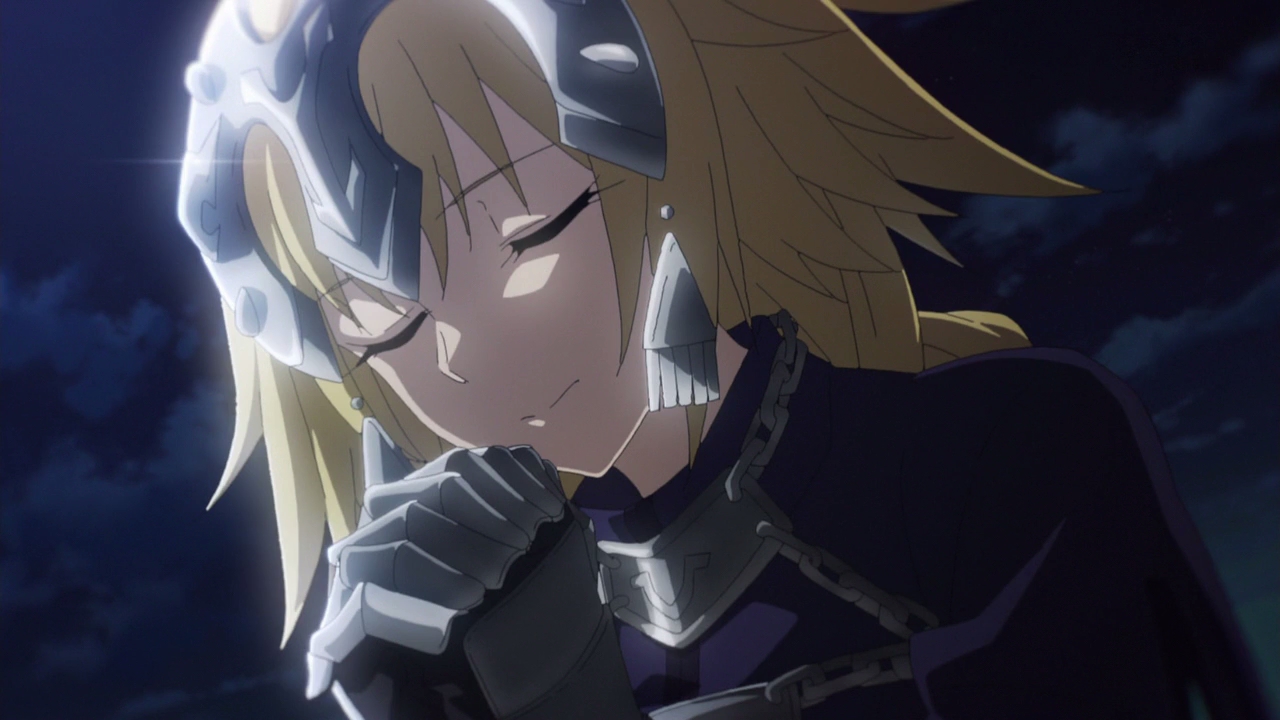
─ Teamwork is the key to this battle, but Jeanne sure knows how to steal the spotlight in spite of that. The staging and use of background animation during her dash up Keter’s body serves two important duties: to be cool as heck, and to get across its colossal size. A feat accomplished twice over by her landing moments later, too! As if that wasn’t enough, she remains in center stage during Arifumi Imai’s guest appearance – Apocrypha has continuously attracted big names from all around the industry, but I doubt anyone saw this one coming! Her nimble evasion of each and every strike is a treat, but the weight and momentum imbued as Keter reels up its first strike may just be favourite part of it all. Imai’s making the most of his experience in WIT’s titanic hell, at least!
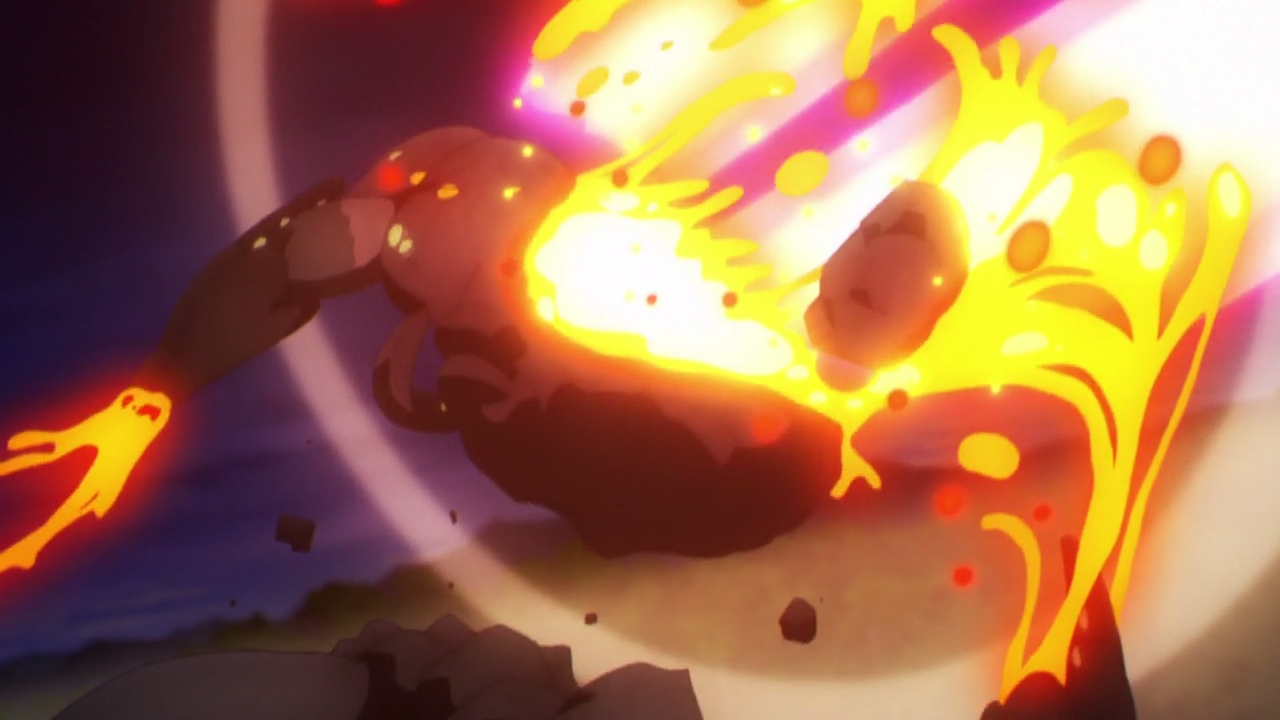
─ There couldn’t be a more fitting way to cap off this fantastic episode than with its final moments. Astolfo entering the scene with a badass grin following Chiron’s monologue about him and firing off Trap of Algaria was already satisfying, but nothing has more impact than the work of action supervisor Takahito Sakazume as Sieg and Mordred effectively nuke Keter out of existence. He hasn’t had much opportunity to show off the full extent of his ability since the very first episode, which may explain why he went above and beyond here. The sequence is laced with lovely FXFX: Shorthand for effects animation – water, fire, beams, that kind of cut. A pillar of Japanese 2D animation. work and drawings that show off his style in full, but it all comes together through his take on the impact caused by a clean headshot with two Noble Phantasms – I wasn’t exaggerating when I said they nuked it! It’s a shame that the show’s schedule hasn’t allowed him to deliver work like this on a consistent basis on top of his main role within it, but we have to take what we get when it comes to these constraints.
Opening
StoryboardStoryboard (絵コンテ, ekonte): The blueprints of animation. A series of usually simple drawings serving as anime's visual script, drawn on special sheets with fields for the animation cut number, notes for the staff and the matching lines of dialogue., Direction: Hideki Tachibana
Chief Animation DirectorChief Animation Director (総作画監督, Sou Sakuga Kantoku): Often an overall credit that tends to be in the hands of the character designer, though as of late messy projects with multiple Chief ADs have increased in number; moreso than the regular animation directors, their job is to ensure the characters look like they're supposed to. Consistency is their goal, which they will enforce as much as they want (and can).: Yukei Yamada
Animation DirectionAnimation Direction (作画監督, sakuga kantoku): The artists supervising the quality and consistency of the animation itself. They might correct cuts that deviate from the designs too much if they see it fit, but their job is mostly to ensure the motion is up to par while not looking too rough. Plenty of specialized Animation Direction roles exist – mecha, effects, creatures, all focused in one particular recurring element.: Takayuki Kikuchi
Action Animation DirectionAnimation Direction (作画監督, sakuga kantoku): The artists supervising the quality and consistency of the animation itself. They might correct cuts that deviate from the designs too much if they see it fit, but their job is mostly to ensure the motion is up to par while not looking too rough. Plenty of specialized Animation Direction roles exist – mecha, effects, creatures, all focused in one particular recurring element.: Shun Enokido, Takahito Sakazume
Key AnimationKey Animation (原画, genga): These artists draw the pivotal moments within the animation, basically defining the motion without actually completing the cut. The anime industry is known for allowing these individual artists lots of room to express their own style.: Yukie Yamamoto, Kouta Sera, Ryo Kodama, Minami Yoshida, Kai Shibata, Ryosuke Kimiya, Yurie Hama, Yuuki Oomori, Takehiro Miura, Toru Iwasawa, Michihiro Kosaka, Tatsuyuki Maeda, Tomoya Nishiguchi, Koichi Kikuta, Kiminori Ito, Takayuki Kikuchi, Shun Enokido, Takahito Sakazume
─ A definite step up in comparison to the previous opening, although it still leaves something to be desired. The balance of fast paced combat is always a tricky one to nail; it can be as thrilling as they come when done right, but compromising the readability of the animation can make it hard for the viewers to parse. This is unfortunately the case for both Astolfo’s square-off with Achilles and Jeanne’s with Atalanta, though it’s only right to attribute some of that to the curse of ghosting that’s been plaguing this show since the beginning. And speaking of Jeanne, she seems to be as photogenic as ever. Amusingly enough though, it’s the short cut of Shiro’s walk that stood out to me most. Low angle framing, smooth fabric movement and solid depiction of his confident strut; that’s one way to make such a simple sequence feel so cool.
Ending
StoryboardStoryboard (絵コンテ, ekonte): The blueprints of animation. A series of usually simple drawings serving as anime's visual script, drawn on special sheets with fields for the animation cut number, notes for the staff and the matching lines of dialogue., Direction: Tadahito Matsubayashi
Animation DirectionAnimation Direction (作画監督, sakuga kantoku): The artists supervising the quality and consistency of the animation itself. They might correct cuts that deviate from the designs too much if they see it fit, but their job is mostly to ensure the motion is up to par while not looking too rough. Plenty of specialized Animation Direction roles exist – mecha, effects, creatures, all focused in one particular recurring element.: Tomoko Sudo
Key AnimationKey Animation (原画, genga): These artists draw the pivotal moments within the animation, basically defining the motion without actually completing the cut. The anime industry is known for allowing these individual artists lots of room to express their own style.: Norie Tanaka, Asami Tashiro, Mai Ogawa, Miyuki Koga
─ While expected, it’s still disappointing to see what is an entirely forgettable ED replace one I enjoyed a lot. I wish there was more to say than that, but alas.
Support us on Patreon to help us reach our new goal to sustain the animation archive at Sakugabooru, SakugaSakuga (作画): Technically drawing pictures but more specifically animation. Western fans have long since appropriated the word to refer to instances of particularly good animation, in the same way that a subset of Japanese fans do. Pretty integral to our sites' brand. Video on Youtube, as well as this SakugaSakuga (作画): Technically drawing pictures but more specifically animation. Western fans have long since appropriated the word to refer to instances of particularly good animation, in the same way that a subset of Japanese fans do. Pretty integral to our sites' brand. Blog. Thanks to everyone who’s helped out so far!